How I Secured My 3-Server Trading Infrastructure
I run algorithmic trading bots on a small infrastructure - a laptop for development, a cloud server (PROD) running live services 24/7, and a home GPU box (PC) for ML training. Real money flows through this system every day.
For months, I operated with basically zero security beyond SSH keys. Then I spent a week actually locking things down. This post documents every layer I built, why each one matters, and the mistakes I made along the way.
If you run any kind of self-hosted infrastructure - trading bots, side projects, home labs - most of this applies directly.
The Setup
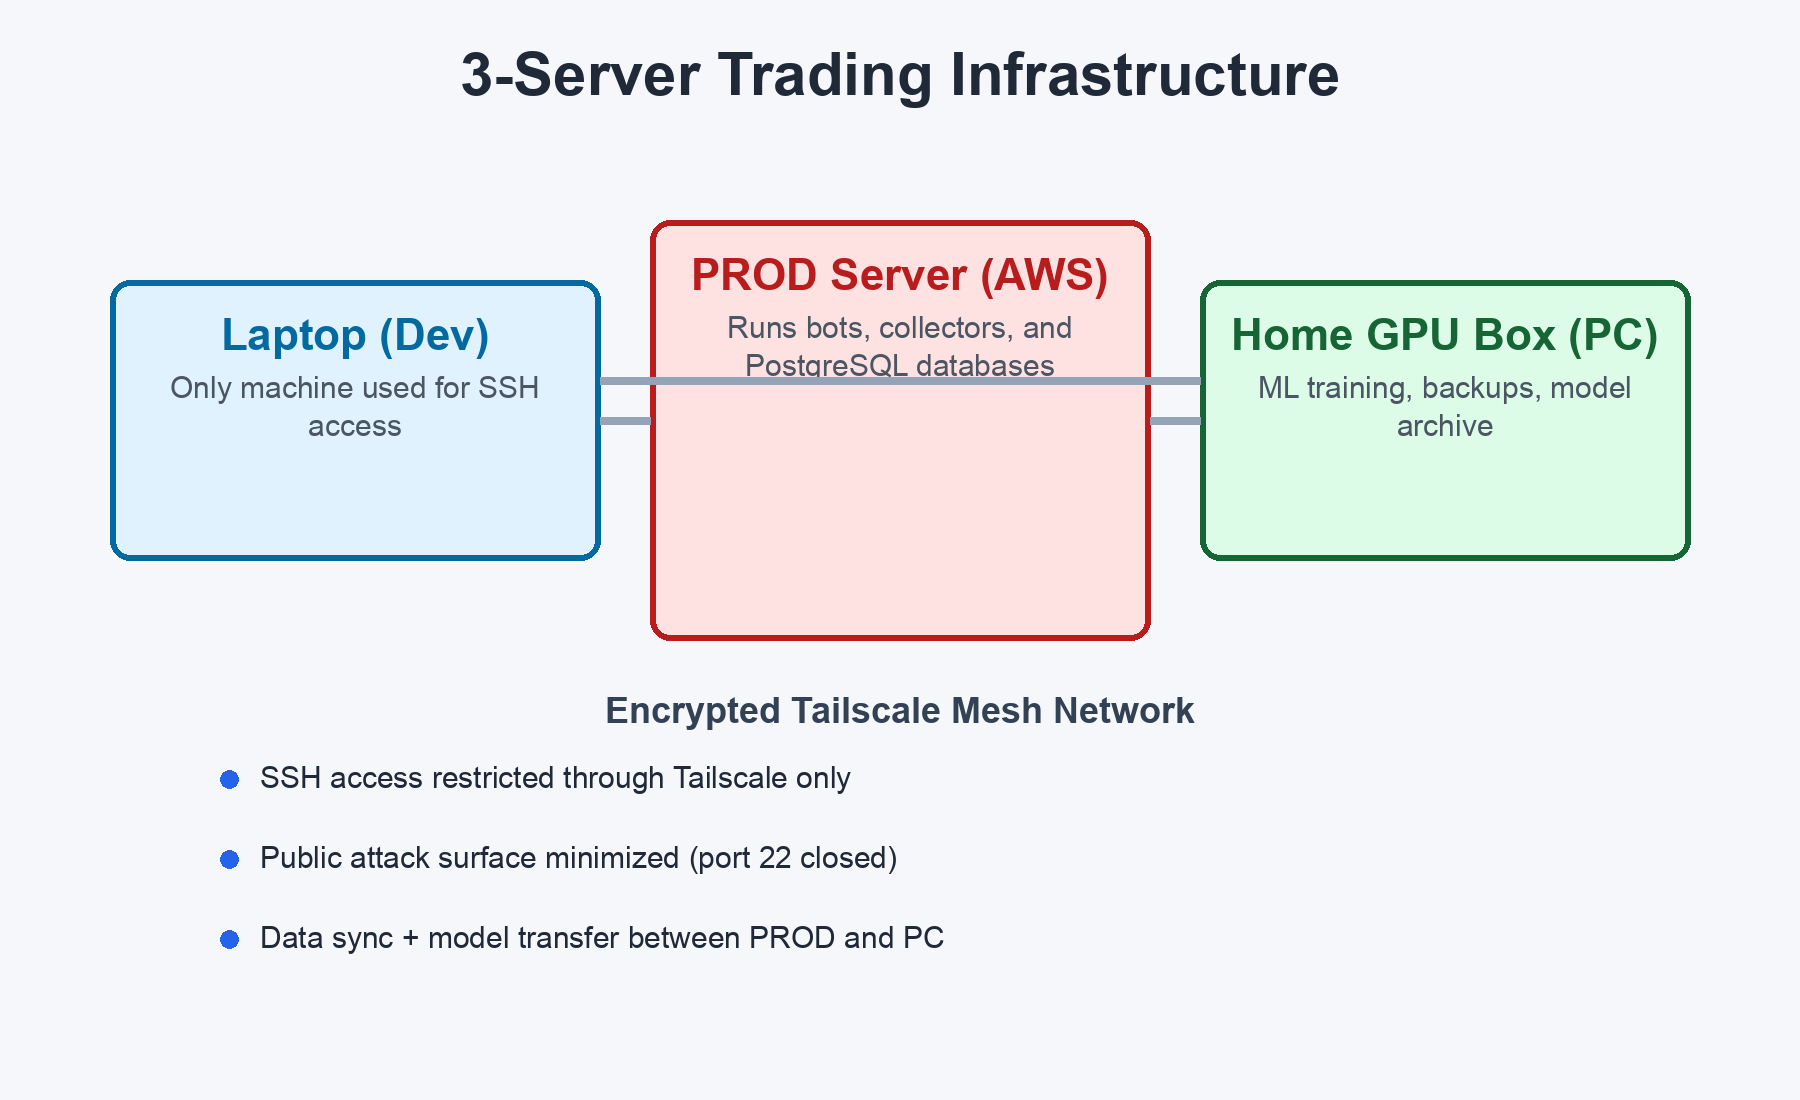
PROD is the crown jewel. It runs 10+ services including trading bots, data collectors, and multiple PostgreSQL databases. If PROD is compromised, an attacker could execute unauthorized trades. PC trains ML models on a GPU. Laptop is the only machine I SSH from.
The Philosophy: Security as an Onion
No single security measure is bulletproof. Instead, we stack independent layers so that if one fails, others still protect us. This is called defense in depth - the same principle used in banking, military, and enterprise security.
Let me walk through each layer.
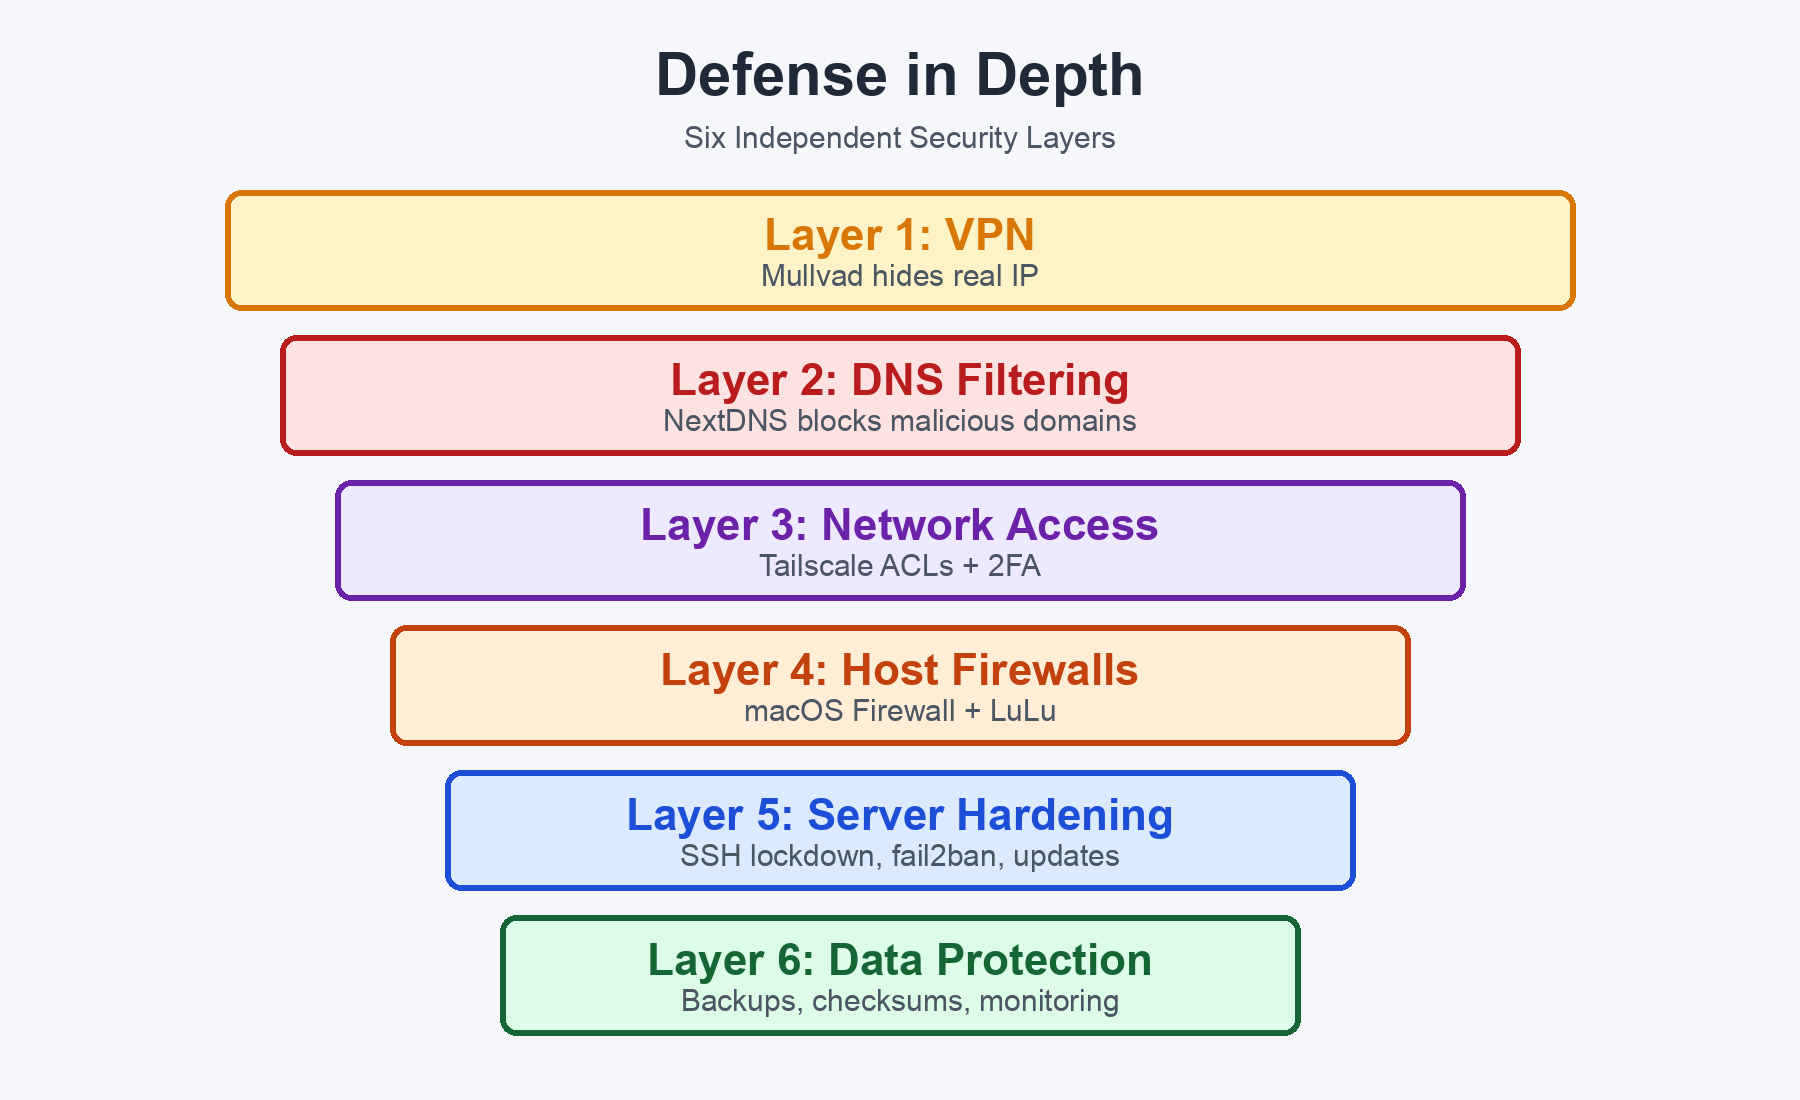
Layer 1: VPN - Hide Your Identity
What: Mullvad VPN via Tailscale Exit Node
Before: My laptop's real IP was visible to every website and service. My ISP could see all browsing. On public WiFi, traffic was sniffable.
After: All laptop internet traffic routes through Mullvad's servers in another country. Websites see a foreign IP. ISP sees only encrypted WireGuard traffic.
Why only the laptop? PROD and PC need direct internet for low-latency API calls. Adding a VPN hop would introduce latency on trade execution - even 50ms matters when you're hitting exchange APIs.
The neat trick: Instead of running Mullvad as a standalone VPN client, I route it through Tailscale's exit node feature. This means Mullvad integrates cleanly with the same mesh network that connects my servers. One tool, not two competing VPN tunnels.
Layer 2: DNS Filtering - Block Bad Domains Before They Load
What: NextDNS on All 3 Machines
DNS is the phone book of the internet. Before your computer can connect to evil-malware.com, it has to look up the IP address. NextDNS intercepts that lookup and says "nope, that domain is known malware" - and returns 0.0.0.0 instead.
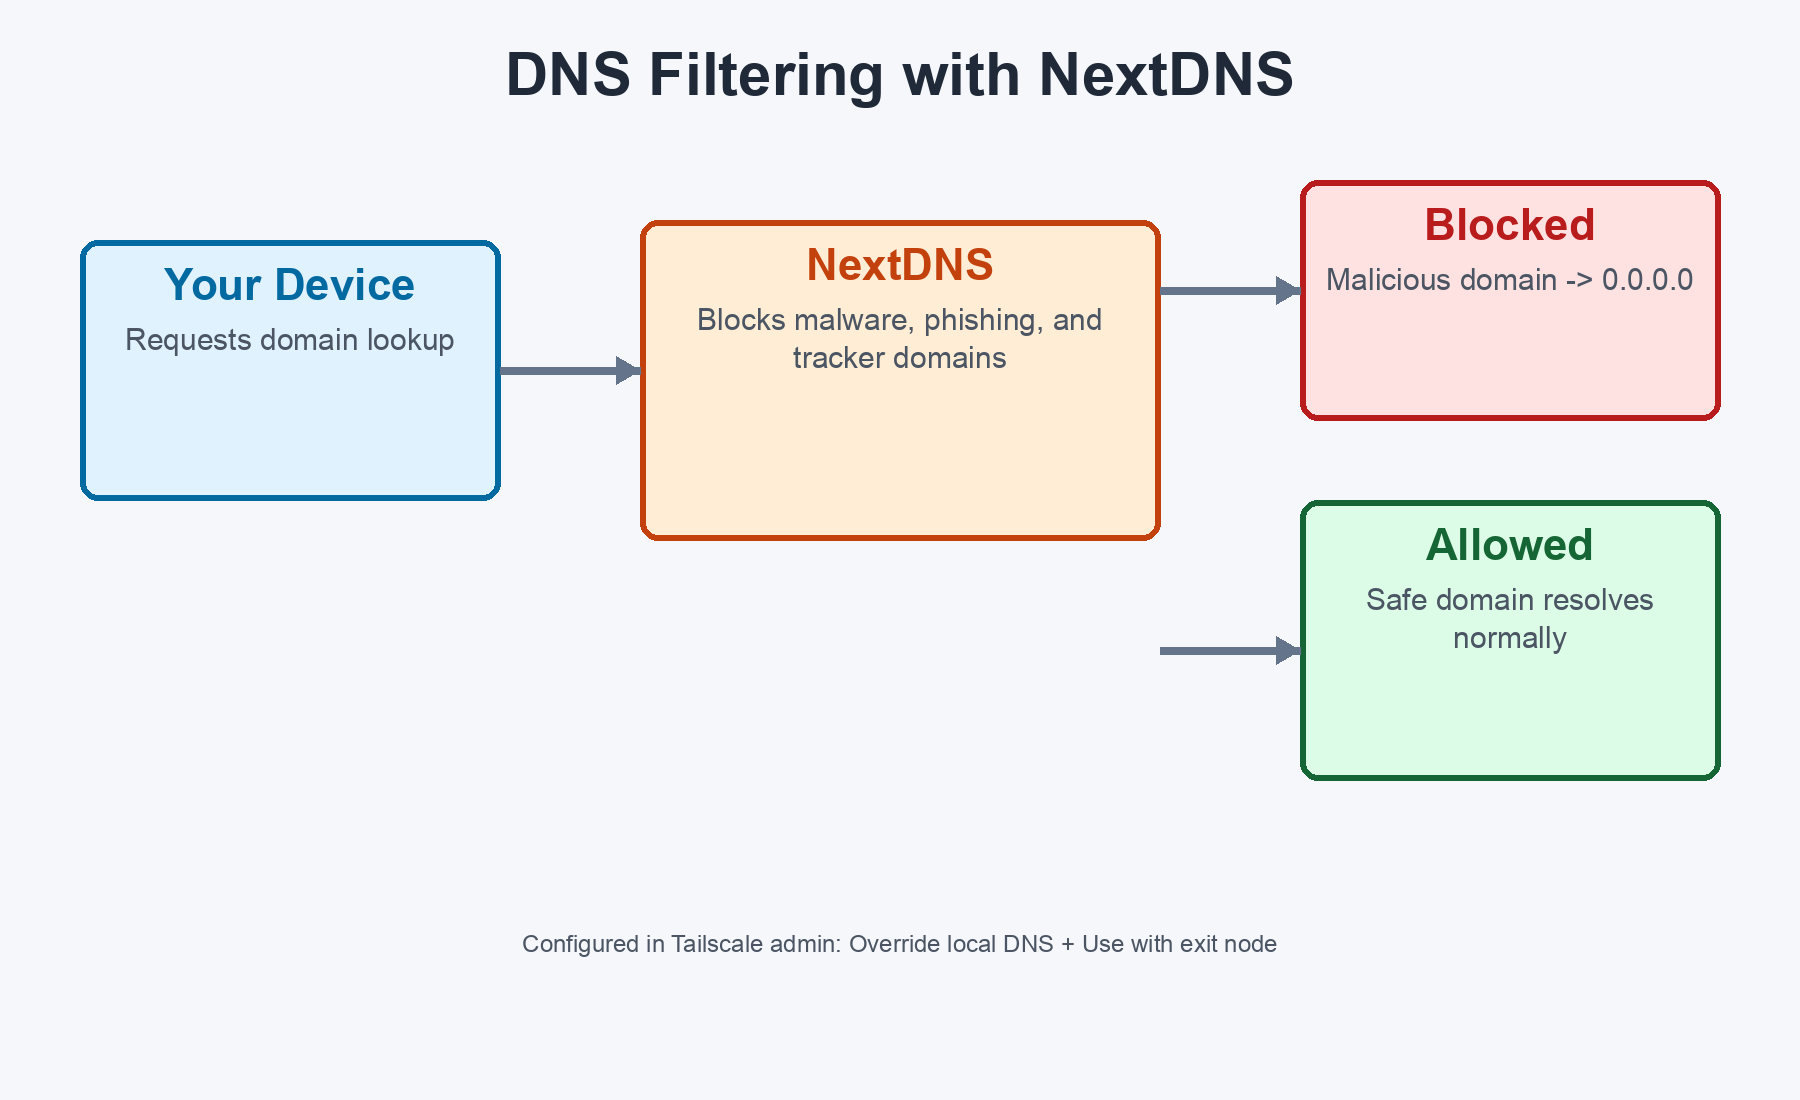
The key decision: I configured NextDNS as the DNS nameserver in Tailscale's admin console, not on individual machines. This means every device on the Tailscale network automatically uses it. Two important toggles:
- Override local DNS - forces all devices to use NextDNS even if they have local DNS set
- Use with exit node - ensures filtering still works when traffic routes through Mullvad
This was important because without "Use with exit node," DNS queries bypass NextDNS when the VPN is active - leaving a gap in protection exactly when you think you're most secure.
Layer 3: Network Access Control - Who Can Talk to Whom
Tailscale ACLs (Access Control Lists)
Tailscale creates an encrypted WireGuard mesh between all my machines. But by default, every machine can reach every other machine on every port. That's too permissive.
I configured ACLs so the laptop can only reach SSH (port 22) on the servers. Nothing else - no database ports, no web dashboards, no service endpoints. PROD and PC can talk freely to each other because they need to sync data, transfer models, and run database operations.
Why this matters: If someone somehow joins the Tailscale network (compromised device, stolen session), they can only reach SSH ports - not PostgreSQL, not your dashboards, not your APIs.
Two-Factor Authentication
Tailscale delegates login to your identity provider (Google, GitHub, etc.). 2FA is enabled there. To join the Tailscale network, you need to authenticate. With 2FA, even a stolen password isn't enough.
Key Expiry
Tailscale keys expire after 180 days by default. When they expire, each device needs to re-authenticate - tailscale up, open the URL, approve. About 30 seconds per device.
The only wrinkle: if your cloud server's key expires and you've closed the public SSH port (Layer 5), you need to temporarily re-open it via your cloud console to get in and re-auth. Not hard, but worth knowing about.
Layer 4: Host Firewalls - Control Traffic at Each Machine
macOS Firewall (Inbound) + LuLu (Outbound)
The built-in macOS firewall blocks unsolicited incoming connections. But most people stop there. LuLu watches the outgoing traffic too.
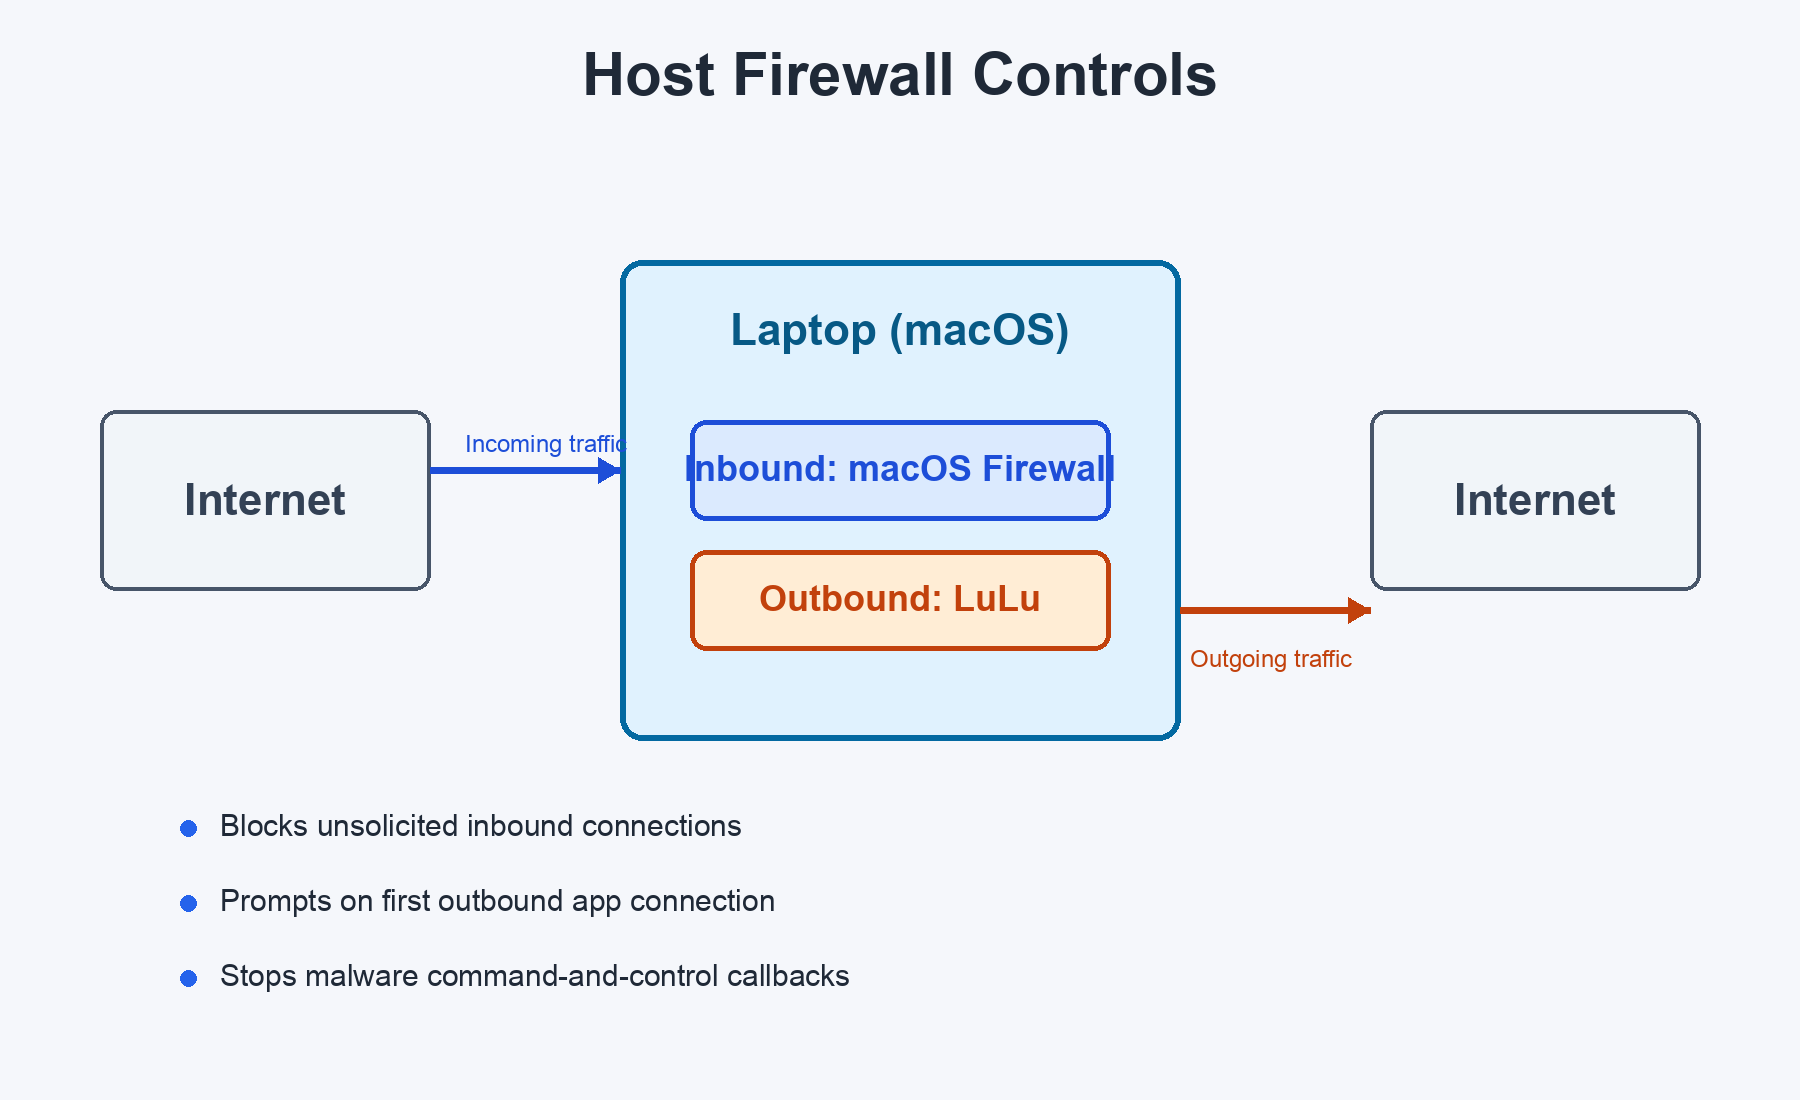
If any app on your Mac tries to connect to the internet for the first time, LuLu pops up an alert: "Do you want to allow this?" This catches:
- Malware trying to phone home
- Apps sending data to analytics servers you didn't know about
- Unexpected network activity from trusted apps
Install with brew install --cask lulu. It's open-source and maintained by Objective-See (Patrick Wardle, former NSA).
Layer 5: Server Hardening - Lock Down the Cloud Server
PROD has a public IP on AWS. Bots are constantly probing it. I did four things:
SSH Hardening
Applied strict SSH settings: root login disabled, password auth disabled, only one specific user allowed, 3 max auth tries, 30-second login grace time. An attacker needs your exact PEM key AND must connect as the right user.
fail2ban
Automatically bans IPs that fail SSH login repeatedly. 5 failures in 10 minutes = banned for 1 hour. Simple but devastatingly effective against brute-force bots.
Unattended Security Updates
The server automatically installs security patches daily. When a critical CVE drops, your server patches itself within hours, not days. It does NOT do full OS upgrades or auto-reboot - just security patches from Ubuntu's official pocket.
Closed Public SSH Port
This is the biggest single security win. Port 22 is CLOSED in the cloud security group. The only way to SSH into PROD is through the Tailscale mesh network. The entire internet can no longer even attempt to connect to SSH. Attack surface dropped to zero for external actors.
Layer 6: Data Protection - Because Hackers Aren't the Only Threat
All the network hardening in the world doesn't help if your disk dies, a bad query wipes a table, or a corrupted model file silently degrades your trading performance.
Database Backups
A cron job runs every evening after market close - dumps each database in compressed format, rsyncs to the PC server (800+ GB free), and maintains retention: 7 daily + 4 weekly + 3 monthly snapshots. Telegram notification on every run.
ML Model Archiving
Every training run archives the trained models before cleanup. If a new model performs badly in live trading, I can roll back to any of the last 30 training runs.
Model Integrity Verification
Models are trained on the GPU box and transferred to PROD via rsync. After training, SHA256 checksums are computed. After transfer, they're verified. If any file is corrupted - Telegram alert, previous model kept, new model rejected.
Security Monitoring
A script runs every 15 minutes checking failed SSH attempts, disk usage, service status, and fail2ban activity. Plus a daily Telegram summary at 9 PM.
The Complete Attack Chain
Here's what an attacker faces trying to reach my infrastructure:
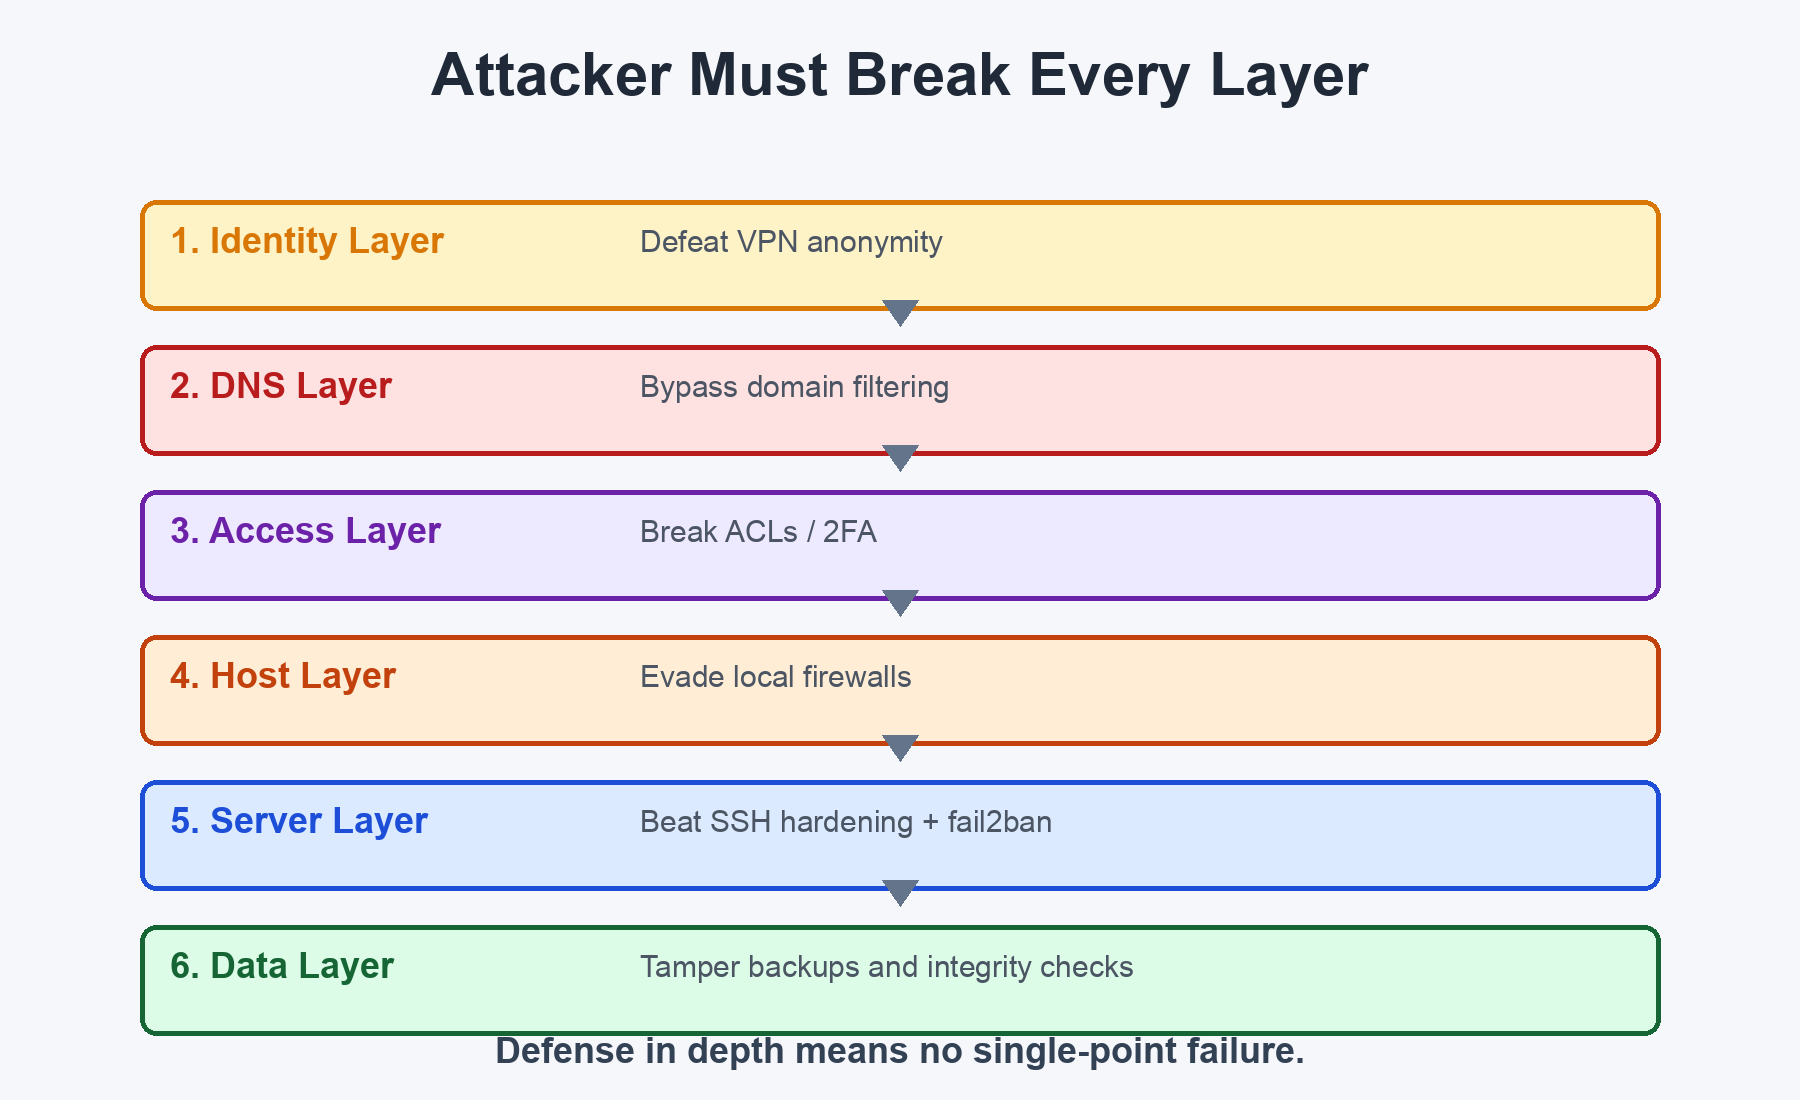
No single layer is perfect. But an attacker would need to defeat multiple independent layers to reach the trading infrastructure. That's the whole point of defense in depth.
The Summary
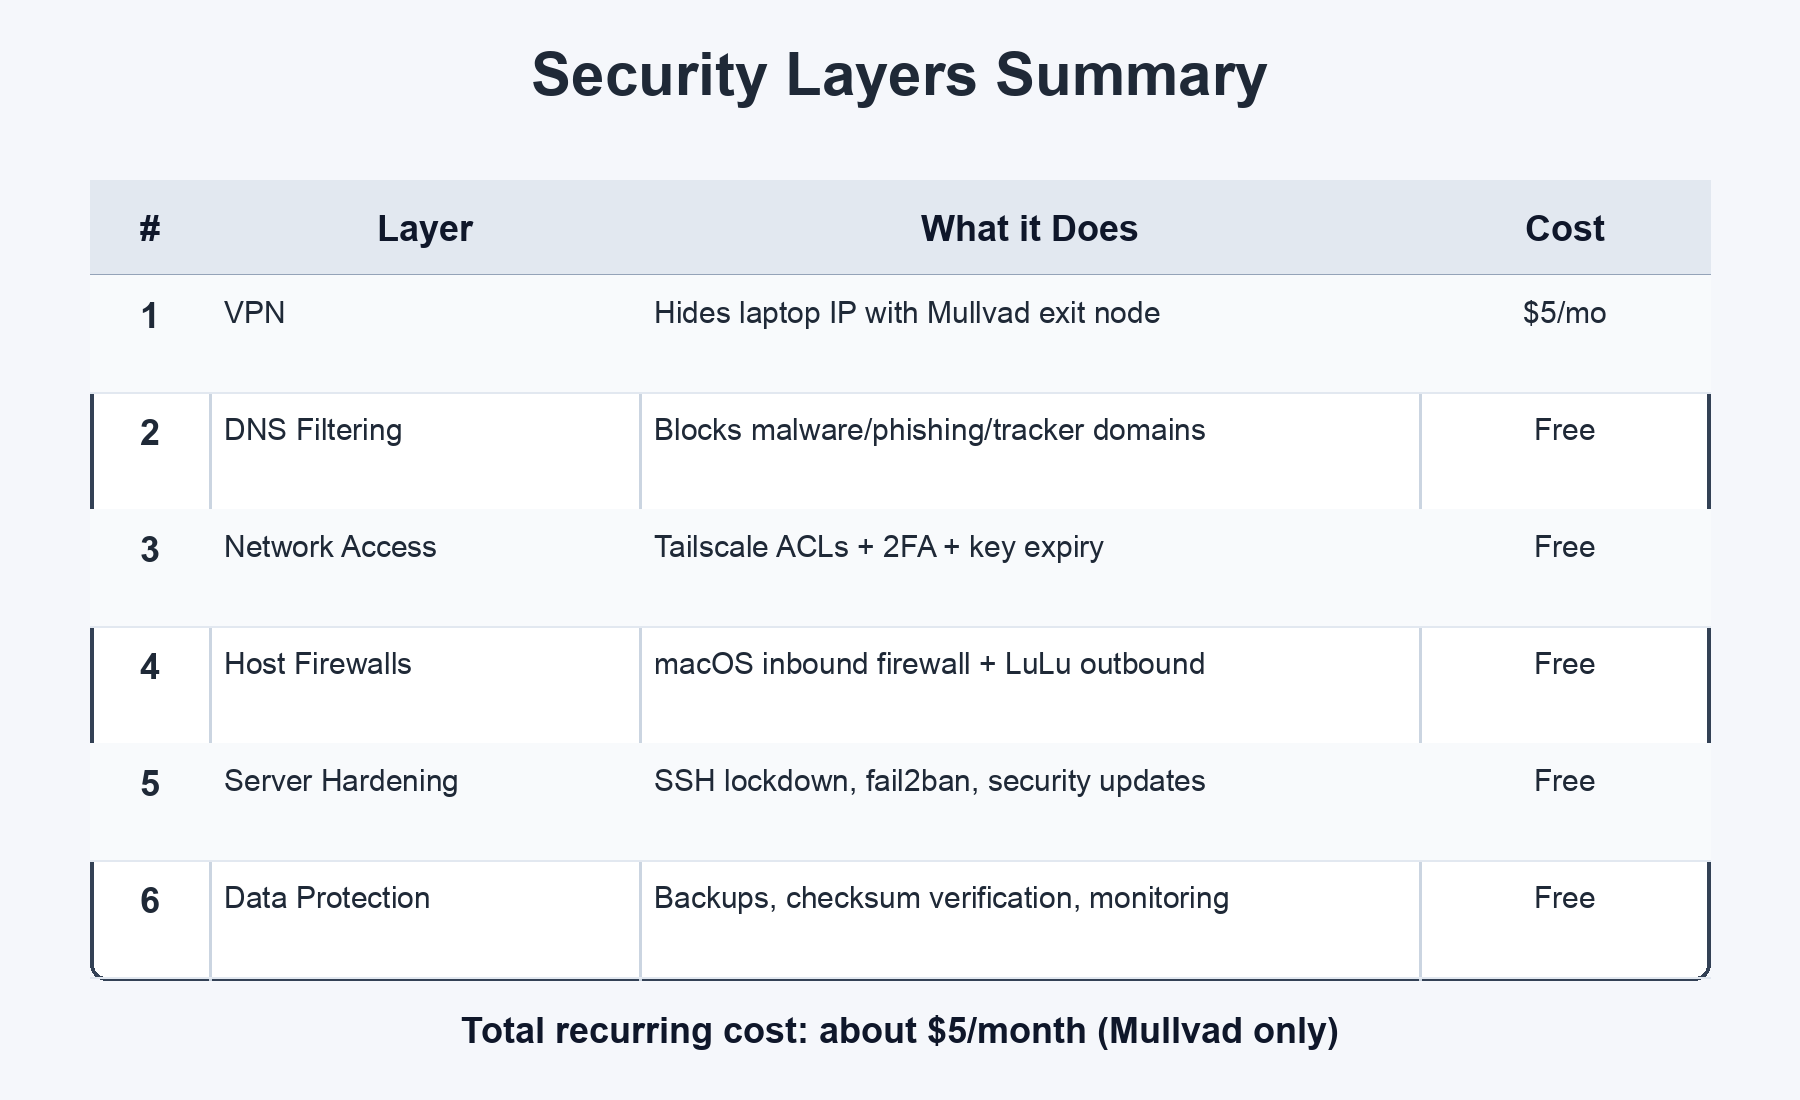
Total monthly cost: about $5 for Mullvad. Everything else is free or included.
The single highest-impact change? Closing port 22 publicly and only allowing SSH via Tailscale. It took 5 minutes and eliminated the entire class of SSH brute-force attacks.
The most underrated layer? LuLu (outbound firewall). Most people only think about blocking incoming traffic. But if malware gets on your machine, it needs to phone home - and LuLu catches that.
Gotchas and Lessons Learned
These are the things that bit me. Save yourself the debugging time.
1. Tailscale ACLs + Mullvad need nodeAttrs. Regular ACL rules don't work with Mullvad exit nodes. You MUST add a nodeAttrs block with "attr": ["mullvad"] for your user. Without it, Mullvad exit nodes disappear entirely. Our first attempt broke all internet access.
2. ACLs use Tailscale IPs, not hostnames. Don't use machine names like "johns-macbook-pro" in ACL rules. Use the 100.x.x.x IPs or user email addresses.
3. NextDNS via Tailscale, not the local CLI. Running nextdns install on a machine doesn't work when Tailscale MagicDNS intercepts DNS. Configure NextDNS in the Tailscale admin console instead.
4. SSH host key verification fails with Tailscale IPs. When you first SSH via a Tailscale IP instead of a public IP, your SSH client sees a "new" host. Use StrictHostKeyChecking=accept-new for the first connection.
5. Keep a second SSH session open when changing SSH config. If you mess up sshd_config, your existing session stays alive. Test from a second terminal before closing the first. Locking yourself out of a remote server is a special kind of pain.
6. Closing port 22 means updating everything. Every script, alias, cron job, and bookmark that uses the public IP needs to switch to Tailscale. Grep your entire codebase for the old IP before closing the port.
Security isn't a destination. It's layers, each one reducing the probability that something goes wrong. You don't need to do all of this at once. Start with the highest-impact items (close public SSH, enable 2FA, set up backups) and add layers over time.
The best security setup is one you actually maintain.